YouTube Levels Fix
How to Prepare Video for Upload from Sony Vegas Pro to YouTube, Vimeo, Facebook, JWPlayer etc..
UPDATE 13th March 2012: This article is intended for people shooting their own videos on consumer devices. It makes generalisations and over-simplifications which imply that some video requires luminance adjustment when in fact it does not. Additionally I have used some terminology that could be more accurate. Unfortunately I do not currently have time to re-write the article to address its deficiencies, but I have decided to leave it online in the meantime because of all the links that point to it, and because I believe it contains more good advice than bad and may help some people who are disatisfied with excessive contrast in their videos on the net. Here is a survey that shows how many devices do not shoot "legal" 16-235 levels. Footage from those devices could be improved with the guidance in this article.
Ever noticed that your online videos have more contast than the ones you uploaded? Are the highlights "blown out" to pure white? Is detail in the shadows getting lost and becoming flat black? This is because for many video formats you need to adjust the levels of your video before you upload it.
Look what happened to this image after I rendered it to an AVC mp4 file and uploaded it to YouTube:
Upload formats tested that require the levels fix include:
- AVC (H.264) (.mp4)
- AVCHD (.mp4)
- HDV (.m2t)
- Sony DV (.avi)
- Quicktime M-JPEG (.mov)
- Sony MXF (.mxf)
- Sony YUV (.avi)
Upload formats tested that do not require the levels fix include:
- Windows Media Video 9 (WMV)
- Windows Media Video 11 (.wmv)
- Xvid (.avi)
- x264vfw (.avi)
Testing was done using Sony Vegas Pro in 8-bit mode pixel format mode. Your video editing software may render files differently. If you have tested more formats, please let me know the result so I can add them to the list.
This "YouTube levels fix" applies to videos that are uploaded to any site or service that displays videos using your browser's Flash Player plugin. I have tested these:
Video hosting sites:
Self-hosting video players:
If you have found the same result with other video hosting sites or video players, please let me know.
If you want the highest quality online video possible, check out my tutorial for rendering video for upload to YouTube, Vimeo etc.. If you follow that tutorial then you do not need to do the levels fix described on this page because it is done in the AviScript instead.
1. Introduction - Color Spaces
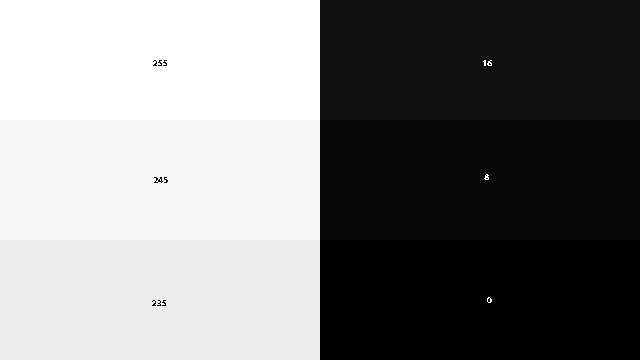
Luminance levels of video are graded on a scale of 0 (black) to 255 (white). Computer hardware and software conventionally expects and displays this full range of luminance which is known as the "Computer RGB" color space. However, for historical reasons, TVs expect and display a more limited range where black is level 16 and white is level 235. This can be called the "Studio" color space. Values in the luminance range 0-16 can be called "superblacks". Values in the range 235-255 can be called "superwhites". If you have footage with a lot of contrast it may appear like this:
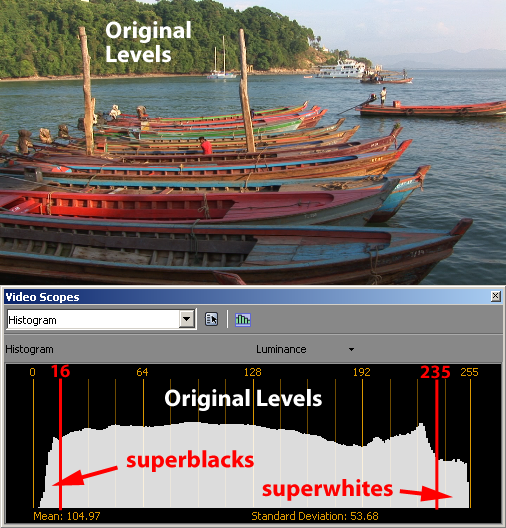
Much computer software will display video at the same levels that it was rendered at. However, in your browser the AVC file from YouTube, Vimeo etc. is played by the Adobe Flash Player plugin, and this does not follow conventional rules. It expands the luminance range of video it receives by mapping level 16 (near-black) to level 0 (black), and level 235 (near-white) to level 255. So the video you see has more contrast than the same video seen in many computer programs. Superwhites and superblacks will simply be clipped off. This means that detail in the near-black and near-white areas of the video will be lost. Many DVD players and TVs do the same thing.
So if the video you upload does not conform to 16-235 then it will lose detail in the shadows and highlights during playback.

2. Conforming Video to 16-235 Levels - Simple Method
To prepare for upload to YouTube or Vimeo we need conform our video to "broadcast legal", Studio RGB levels, so that when we watch it on YouTube or Vimeo the luminance appears the same as that we uploaded, and without clipping. One way to do this is to add a [0,255] to [16,235] conversion filter to the output of your non-linear video editing program (NLE) such as Sony Vegas Pro.
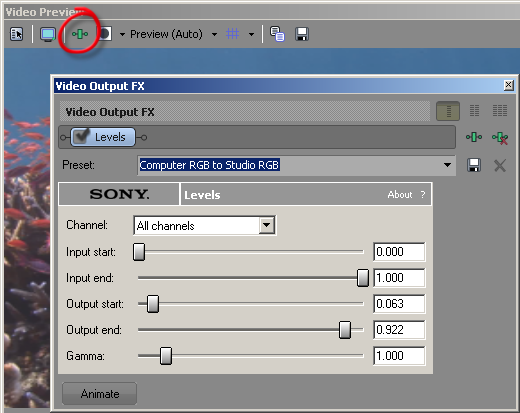
In Sony Vegas Pro you can do this by adding Sony Levels filter to the video output, and choose the "Computer RGB to Studio RGB" preset. You could also find a similar preset in the Sony Color Corrector filter, but only choose one or the other, not both or you will compress the levels twice. After applying the filter you should see reduced contrast in your video.
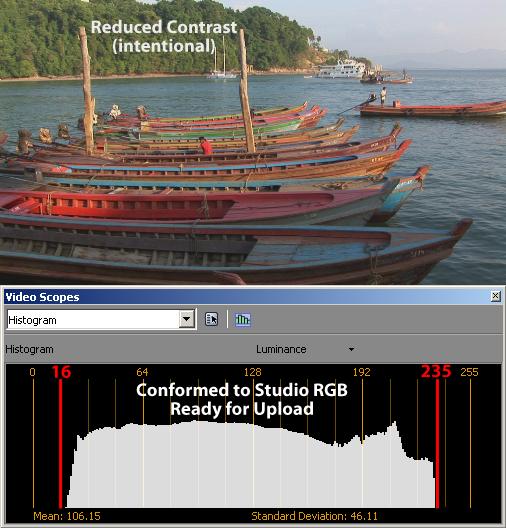
Now you can render the video to a format such as AVC (H.264) .mp4 for upload to YouTube/Vimeo etc..
That is a rather blunt way of conforming the levels, but gives a WYSIWYG path from camera to web.
3. Conforming Video to 16-235 Levels - Longer Method
A more sophisticated way to conform levels is at media or event or track level. This is essentially the same as preparing the project for broadcast and is a skilled task that is beyond the scope of this article.
If you're taking this approach then a good idea is to create a level 16 "underlay" as your lowest track, which ensures that translucent parts of your video (e.g. fades or the background of titles) stay legal and don't drop below 16. The default background in Sony Vegas Pro is level 0, which is an illegal black.
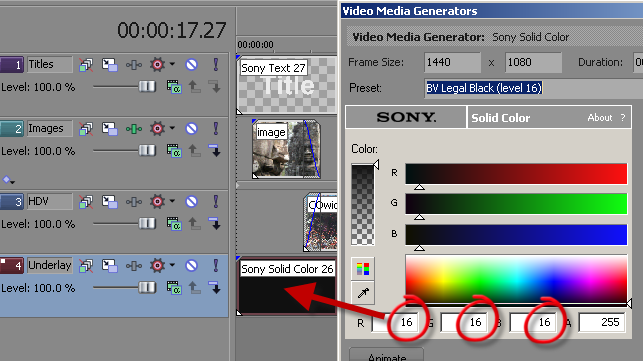
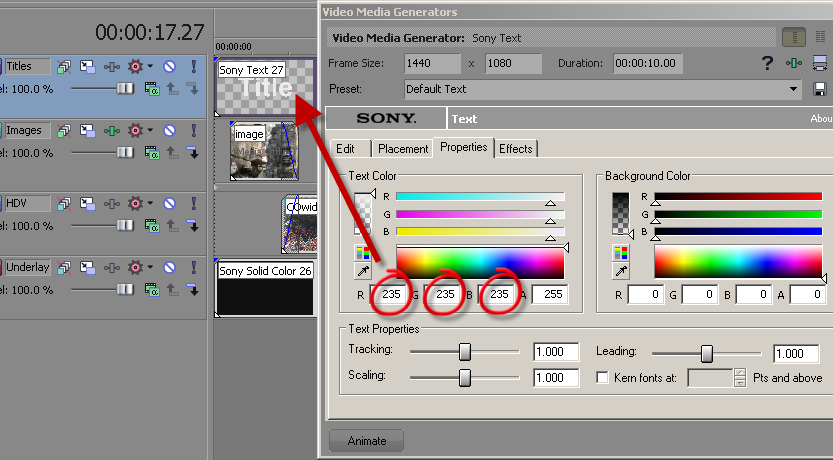
Also make sure that all titles and graphics are no brighter than level 235. e.g. In Sony Vegas Pro the "Text Color" levels of "white" generated media text should look like this:
Still images exist in the Computer RGB color space, as do videos taken by stills cameras, so you may want to put them on their own track with a Levels track FX on it, with the Computer RGB to Studio RGB preset.

You would then need to adjust the levels/colours of the video events in the project by using the appropriate FX plugins such as Levels, Color Corrector and Color Curves, and using Vegas Pro's Video Scopes to monitor the output. FX can be applied as track FX, media FX or event FX as necessary.
The issue was discussed on the Sony Vegas Pro video discussion forum in this thread, which shows great examples of blown-out highlights resulting from expanding levels. This page itself is discussed on the in this thread. If you have comments please post them there or email me. For a deeper and more informed look at this subject, read Glenn Chan's article on Color Spaces and Levels in Vegas Pro.
Credits
Thanks to the helpful folk on the Sony Vegas Pro discussion forum, including Musicvid (Mark), Laurence, farss (Bob), amendegw (Jerry) and John Meyer for insight which assisted with this article. Thanks to Jerry, Kimberly and "Stringer" (Gregory) for permission to use test footage.

