How to Encode Xvid Video from Sony Vegas
This tutorial explains my method for encoding Xvid video from high definition video sources such as HDV. I am using Sony Vegas Pro but much of this tutorial would also help you create Xvid videos from other NLEs like Premiere Pro or Canopus Edius.
NOTE: This tutorial was written in 2007. If you are doing this now, you may be better served by rendering x264 video which has a higher quality:bitrate ratio. See my tutorial for rendering high quality video for the web for details.
The tutorial was originally written to help users post video to Stage6.com, which hosted large DivX and Xvid videos. Sadly Stage6 has now been closed but Xvid videos can still be delivered in a number of ways (see bottom of page).
Tools Required
- Sony Vegas - Sony Vegas Pro 8.0a used at time of writing. Sony Vegas is an excellent NLE (non linear editor) for editing video.
- Debugmode Frameserver - version 2.3 used at time of writing. Debugmode frameserver is a free application for transferring video from one application to another on demand without the need to render a large intermediate file. We will use this to transfer your video from Vegas to VirtualDub.
- VirtualDub - version 1.7.7 used at time of writing. VirtualDub is a free application for capturing and processing video. We will use this for deinterlacing and resizing your video, and as a host for Xvid.
- Xvid - version 1.1.3 used at time of writing. Xvid is a free video codec similar to DivX. Videos encoded with Xvid look similar to DivX videos and can be played with the DivX codec and web player.
- LAME ACM MP3 Codec - version 3.97 used at time of writing. Lame is a free high quality MP3 encoder.
Optional Tools
- Smart Deinterlacer Filter - version 2.8 beta 1 used at time of writing. Smart Deinterlacer is a free filter for VirtualDub. You can use this as an alternative deinterlacing method if you want to experiment for the best quality or if you want to upload video of a different resolution than 960x540 pixels.
- DivX Pro - Another video encoder similar to Xvid. Some might say the result is superior, others not. But it costs $19.99 at the time of writing and I find the configuration more complicated than Xvid.
Downloading and Installation
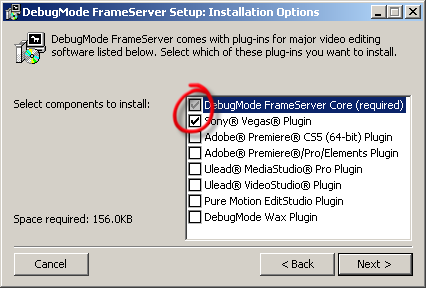
Debugmode Frameserver Installation:
Download here. During installation be sure to tick "Sony Vegas Plugin".
VirtualDub Installation:
The VirtualDub zip download for Windows does not contain an installer, it is simply the VirtualDub executable and other files. Unzip the contents to a folder such as c:\Program Files\VirtualDub-1.7.7\. To make accessing the program easy, right click on VirtualDub.exe and choose "Send to Desktop" and use that, or drag that shortcut into your Start menu.
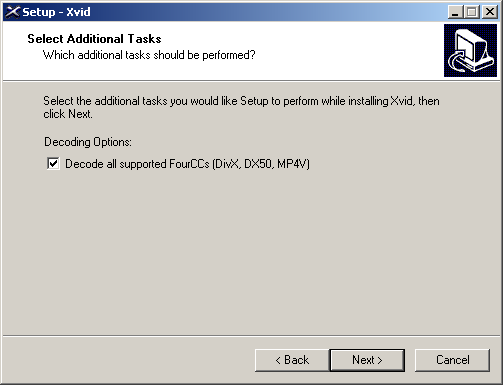
Xvid Installation:
Make sure you get the Windows Installer of Xvid. I ticked the box to "Decode all supported FourCCs".
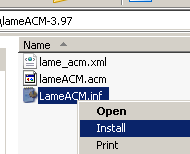
Lame ACM MP3 Codec Installation:
The Lame site itself does not offer a Windows binary of Lame. I downloaded the LAME ACM MP3 Codec 3.97 final from free-codecs.com. Alternatively you can download it from rarewares.com.
Unzip the contents, right click on "LameACM.inf" and choose "Install":
More instructions here if you have trouble.
Smart Deinterlacer Filter Installation:
Download here. You don't need this unless you want to experiment with quality by trying its different deinterlacing methods. Unzip the file and place Smart.vdf and Smart.html in your VirtualDub plugins folder which is probably something like C:\Program Files\VirtualDub-1.7.7\plugins\
Rendering / Encoding
Sony Vegas
First of all, check your project properties in Sony Vegas. Debugmode Frameserver will use these settings when it transfers the video to VirtualDub.
In Vegas choose "File > Project Properties".
I am working with 1080i50 HDV, so my video project properties look like this:
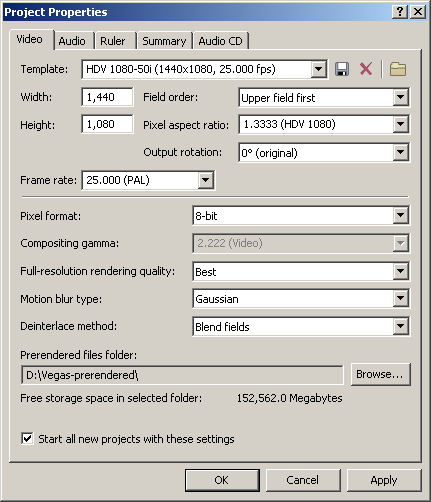
Note there are only 2 differences from the Vegas Pro 8 defaults in the "HDV 1080-50i (1440x1080, 25.000 fps)" template. I have changed "Full-resolution rendering quality" from "good" to "best" and I have set the "Prerendered files folder" to "D:\Vegas-prerendered\" a new folder that I have made on a different drive from Vegas (C:\) and my video assets (.m2t files and .avi files which are on my E:\ drive). Actually the prerendered files folder is irrelevant to what we are doing now and you can leave it in the default location on C:\ drive if you don't have a separate drive. I have ticked "Start all new projects with these settings".
Now set the properties on the "Audio" tab of Project Properties:
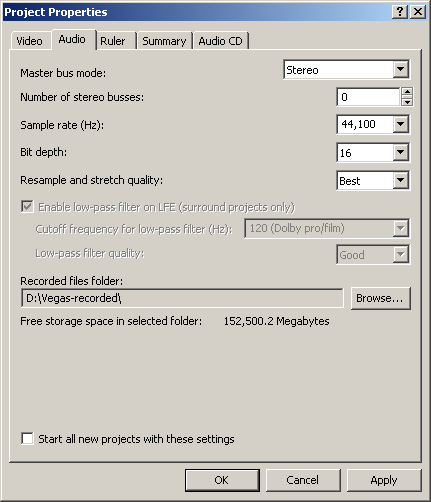
You want to be careful with the sample rate to avoid resampling which will lose some quality. If you are mainly using audio that comes off your HDV tape or ripped from a DVD then choose 48,000 Hz for the "Sample rate (Hz)". However if your sound track is dominated by music taken from a CD or the net then choose 44,100 Hz (unless you know it's different) and let any of the 48,000 Hz audio from the camera resample to 44,100 Hz in the mix.
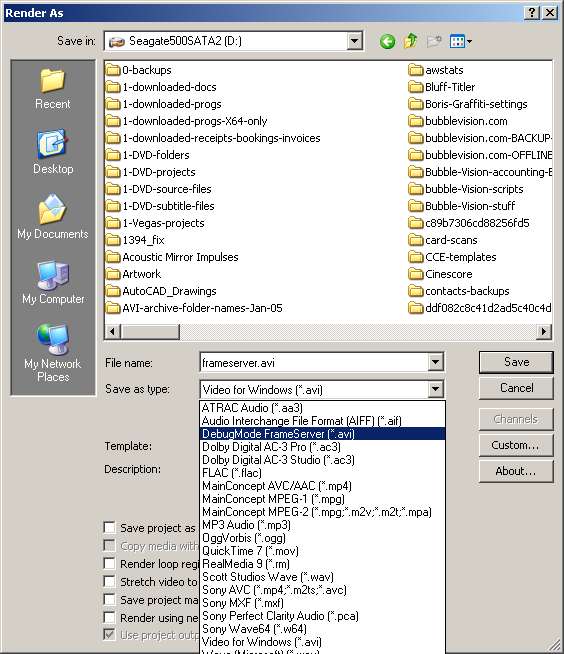
When you are ready to render your finished masterpiece, choose "File > Render As".
File name: I always call it frameserver.avi and save it in my D:\ drive so I know where it is.
Save as type: Choose "DebugMode FrameServer (*.avi) from the drop-down list:
If you only want to render a portion of your timeline then make a loop region and tick "Render loop region only".
Click "Save".
Debugmode Frameserver
When the Frameserver window pops up choose "RGB24" and tick "Write audio as PCM samples in signpost AVI". These settings have always worked well for me but if you want to read about the alternatives there is discussion on the Debugmode website including this thread and in this thread on the Sony Vegas Video forum.
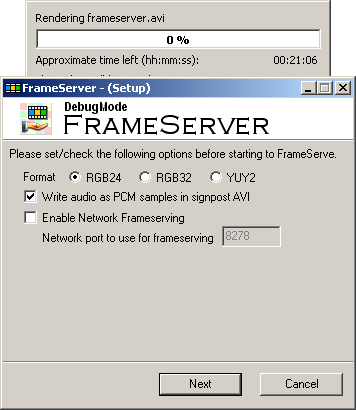
Choose "Next" and you should see this:

There will now be a file called frameserver.avi on your drive, but it's only a small file known as a "signpost" file. The Frameserver is a very clever piece of software that feeds the data as it's required by the application receiving it. Instead of frameserving the data you could write the video to an intermediate file using a codec such as Cineform or Huffyuv or PICVideo M-JPEG, but then you will have an extra step, a big file to deal with, and a small loss of quality.
VirtualDub
Now start VirtualDub from your shortcut and choose "File > Open". Find frameserver.avi (or whatever you called your signpost file) and open it. The first frame of your video will appear at full resolution in the video input pane.
The video will be stretched vertically. It's because VirtualDub is treating your HDV's rectangular (anamorphic) pixels as square, but don't worry about it.
If you have a large display you will also be able to see a video output pane on the right. At this stage we haven't applied any filters so both input and output will look identical and if there is movement in the video you will be able to see some "combing" effect from the interlacing.
Choose "Video" and "Audio" from the top menu and make sure "Full processing mode" is selected on both.
Deinterlacing in VirtualDub
If you don't know what interlacing is, read about it on Wikipedia or 100fps.com. For Stage6 we want progressive video, not interlaced, so if your input video is interlaced (e.g. 1080i50 HDV) then we need to deinterlace it. We could have deinterlaced it in Vegas by setting Field Order to "none (progressive scan)" in the Project Properties, but I prefer the methods we're using here in VirtualDub.
Deinterlace Method 1 for 960 x 540 output video:
In VirtualDub choose Video > Filters... > Add... > Deinterlace > OK
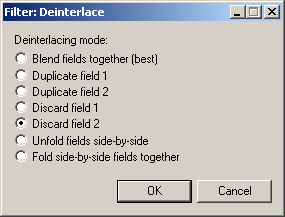
We are making video 540 pixels high, and this is exactly half of the 1080 interlaced lines that your camera has shot. So by just discarding every 2nd field we are neatly turning the video into a progressive signal. If your HDV camera has a 960 x 540 pixel sensor (many do) then this is the method of least quality loss for deinterlacing your video. Credit to Laurence for suggesting this on the Sony Vegas video forum.
Do not use this method if you are making video other than 960 x 540 pixels!
Deinterlace Method 2:
This is another method to choose if you wish to make video other than 960 x 540. It might also be superior to the previous method if your camera does not have 960 x 540 sensors. You will need to install the Smart Deinterlacer Filter as described above.
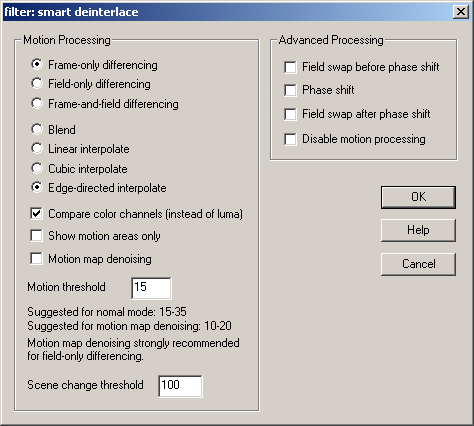
In VirtualDub choose Video > Filters... > Add... > smart deinterlace (2.8 beta 1) > OK
Feel free to experiment with the settings. Results of deinterlacing are very difficult to judge but personally I've had very nice results using all the default settings but selecting "Edge-directed interpolate":
Resizing in VirtualDub:
- In VirtualDub choose Video > Filters... > Add... > Resize > OK and choose the following settings:
- Aspect Ratio "disabled"
- New Size Absolute (pixels) 960 x 540
- Filter mode: Lanczos3
- Framing options: Do not letterbox or crop
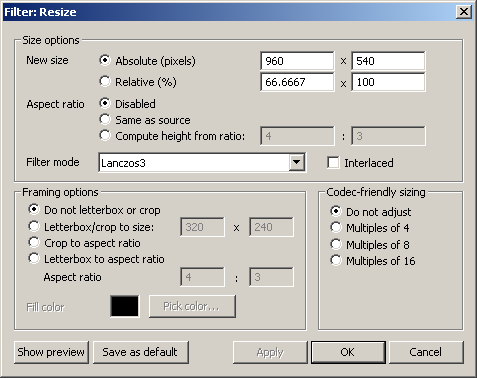
If you're confused that you can't choose a size of 960 x 540 if Aspect Ratio "same as source" is selected, remember that HDV has rectangular (anamorphic) pixels but for web delivery we (generally) want a video with square pixels.
You can click the "Show preview" box to see how you're video is going to look at this size.
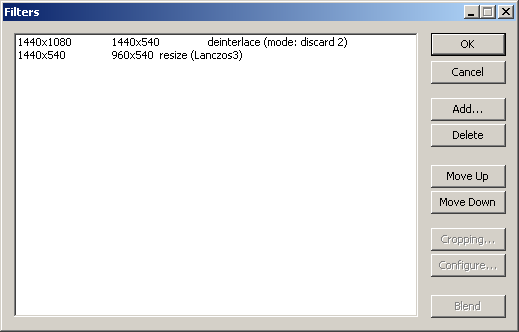
Your 2 filters have now been added and you can click "OK".
Video Compression with Xvid in VirtualDub:
Choose Video > Compression... > Xvid MPEG-4 Codec
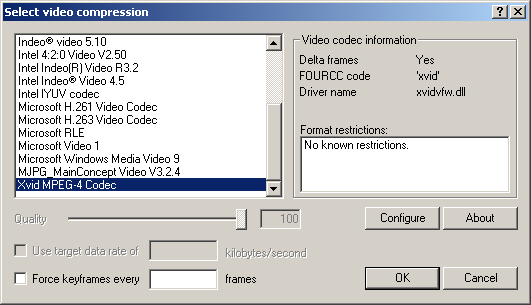
Then click "Configure"
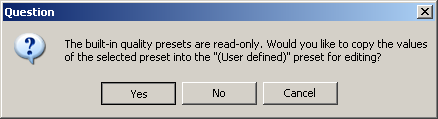
Next to "Quality preset" click "More..." and answer "Yes" to the prompt:
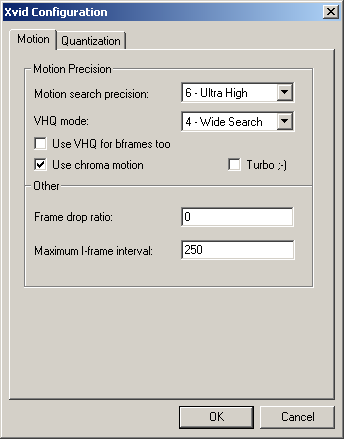
Choose "4 - Wide Search" for "VHQ mode" and set the "Maximum I-frame interval" to 250 if you are compressing 50i video. It should be about 10x the frame rate so leave it at 300 if you are compressing 60i video.
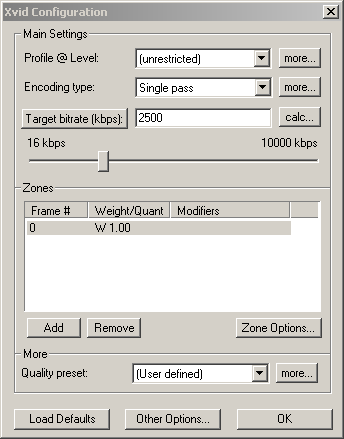
Click "OK" to return to the main Xvid Configuration window. Click "Target quantizer" to toggle to "Target bitrate (kbps)". I choose a bitrate of 2500 kbps and I find 2300 - 2500 kbps to be about the minimum quality I'm happy with for a high definition video of this size. Don't go too high or the video will take forever to download.
You can experiment with 2-pass encoding but that complicates things and I have never found the need to use it. I found that the 2-passes cannot be automated as a batch when using the frameserver. However if you are intent on eeking out every last bit of quality possible there are useful guides to Xvid settings on divx-digest.com and animemusicvideos.org.
One other thing I usually do is click "Other Options" at the bottom and change the FourCC to "DX50", which is the FourCC code that the DivX codec writes into videos since version 5:
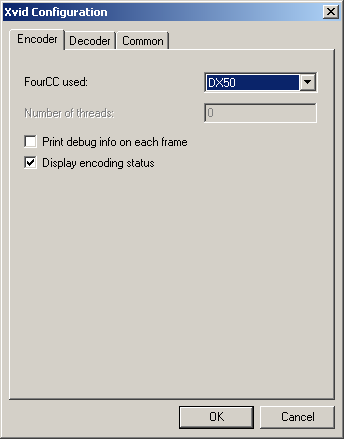
This is probably not necessary but who knows if DivX might one day decide only to show DivX movies with their codec and not Xvid ones. This helps make the movie look like it's been encoded by DivX. Far more computers have the DivX codec installed than the Xvid codec.
You can use DivX Pro to encode instead of Xvid. Some might say the result is superior, others not. But it costs $19.99 at the time of writing and I find the configuration more complicated than Xvid.
If you wonder why not just render to DivX directly from Vegas without the Frameserver and VirtualDub steps, it is because Vegas will not allow a high-quality MP3 stream in a directly-rendered DivX file.
Now press "OK" until you get back to the main VirtualDub window.
Audio Compression:
Choose "Audio > Compression..." then select "Lame MP3" from the left pane.
The choice of settings in the right pane matches the sample rate of the input audio (unless "Show all formats" is ticked). Choose "44100 Hz, 160 kbps CBR, Stereo" or "48000 Hz, 160 kbps, CBR, Stereo" depending on what sample rate was set in your Vegas project properties.
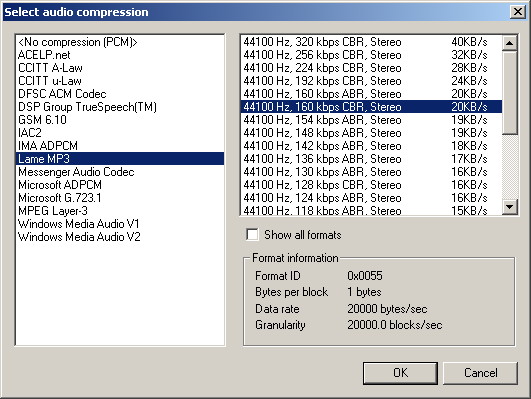
A bitrate of 160 kbps is a good compromise of file size and download speed. The video stream of your file is so large that there is no point scrimping too much on the audio bitrate. 128 kbps is common for MP3 audio and would be OK. If audio is critical to your video, for example if it's a music video, then you may consider going to 192 kbps or higher.
Save your VirtualDub configuration for next time by choosing "File > Save Processing Settings" and call it something descriptive like "xvid-deinterlace-resize-960x540-DX50-2500kbps-mp3-160kbps.vcf", then in the future you can just load it instead of setting everything again.
Now choose "File > Save as AVI..." and choose a folder and filename (NOT the same name as your signpost AVI) and process your video. The Frameserver will do its job in the background, passing video from Vegas to VirtualDub as it's required.
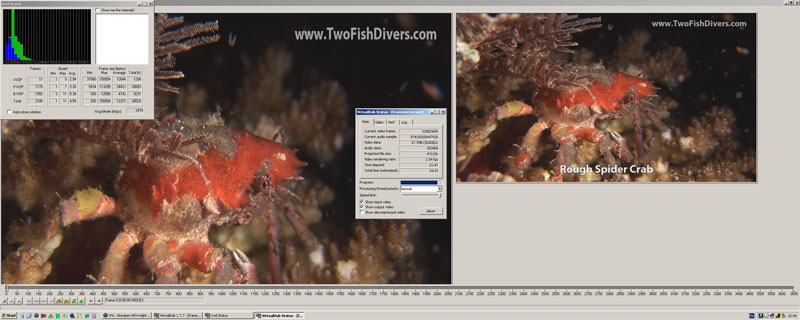
If your window is big enough, or if you rearrange the panes from the "View" menu, you can watch the video live in the output pane as it's processed. Here's how it looks across my dual 17" LCD monitors:
If you have a number of videos to process at once you can tick the box "Don't run this job now; add it to job control so I can run it in batch mode" and then you can run them overnight or whatever by choosing "File > Job control..." later.
When your encode is finished, choose "Stop Serving" on the Frameserver window and "Close" the Vegas rendering progress window, then check your encoded file in your media player (Windows Media Player, VLC, DivX Player etc.).
Playback of your Xvid Video
Once the Xvid or DivX codec or ffdshow is installed, the Xvid video can be played back locally in Windows Media Player, VLC Media Player, DivX Player or many other media players. If you upload the file to the web and publish a link to it, playback behaviour depends on how the viewer's computer and browser is configured. The browser may prompt to open or save the file, or it may attempt to progressively download (often incorrectly called "stream") the file in a plugin such as Windows Media Player or the DivX Web Player.
Embedding with the DivX Web Player
Your finished video can be uploaded to the web and embedded for playback in a web page using the DivX Web Player Code Generator. Then the viewer will need to have the DivX Web Player installed on their computer. If you install this I recommend you to choose the option not to install the Yahoo! Toolbar during installation.
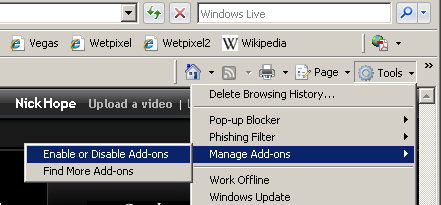
Note I had to manually enable my DivX Web Player plug-in in Internet Explorer 7 because otherwise the site just kept prompting for it.
My HD web video formats comparison shows an Xvid video embedded in a Javascript popup window. Note the video bitrate of that video is 2000 kbps, not 2500 kbps as described above.
Xvid video can also be offered as "additional formats" on blip.tv. So you could have your big, clear, video file hosted free of charge there.
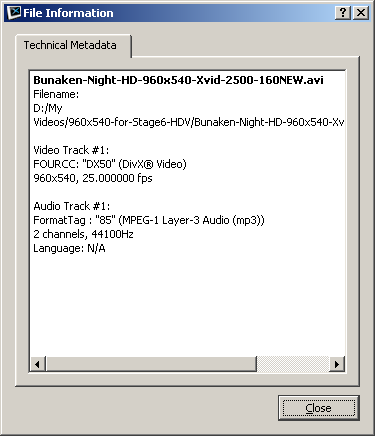
One final tip... if you like the quality of someone's DivX or Xvid video, download them and open them in the offline DivX Player that comes with the free DivX bundle. Right click on the video while it is playing and choose "File Information...". Then you can see the video's various parameters including bitrate and size: